August 2026 Inspiration Challenge

Each month, a member of the Altenew Design Team (or guest designer) selects a photo that they have taken and then uses that as inspiration for a project. We want to share the fun, of course, and so we invite YOU to use your own creativity to make a project inspired by this month's photo. This month's host is Nathalie.
August 2026 Inspiration Challenge Photo

Hi there! It’s Nathalie with you today, and I am so excited to host the August 2026 Inspiration Challenge! Sometimes the most unexpected moments and things are the ones that bring you the most inspiration. I love documenting everything that happens in my life which works twofold, once for saving memories and the other because it lets me practice my photography. So, when I saw this simple onion (as I was unpacking my groceries), I thought how I could use it to tell my story of the day. I love how the shadowy light enhances the soft coral pink husk opening to showcase the deep purples of the inside bulb. The perfect color combo and movement to be inspired for a new project.
Crafting the Card: Blending Colors and Geometric Textures

I love how the framed background brings the softness and angles of the window -in the photo-while the soft flowers in contrasting hues of soft coral pink and bold purples bring a similar feelas the one in the onion in the photo.
Step-by-Step Tutorial: How to Create This Dimensional Card
Follow these step-by-step cardmaking instructions to recreate this look for your entry into this month's Altenew Inspiration Challenge:

Step 1: Prepare and Emboss the Background Frames
- Cut a 5” x 7” heavy white cardstock piece for your main card panel.
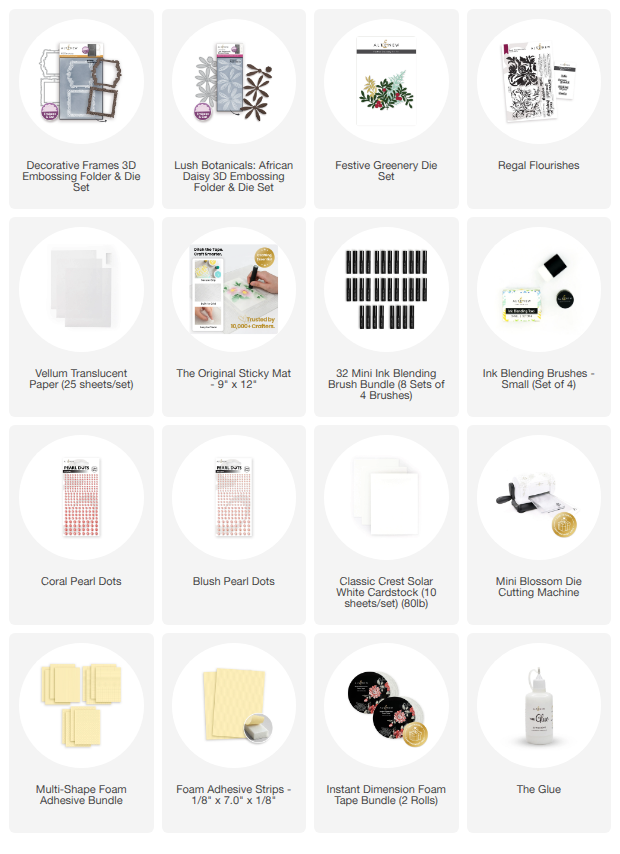
- Use the Decorative Frames Die Set to cut ten (10) square frames from white cardstock. Next, run them through with the coordinating Decorative Frames 3D Embossing Folder to add detailed relief to each frame.
- Stack and adhere two frames together to create a thicker, sturdier frame (set aside). Note: This will yield five (5) thicker frames.
- Use Dove Gray Fresh Dye Ink to color five (5) negative pieces left from the frame die cuts. Then, use Stone Wall Fresh Dye Ink to add depth around the perimeter of the negative pieces.
- Adhere the frames at an angle so they sit across the top half of the panel. Trim the excess edges and use the leftover pieces to complete the framed look at the top.
- Adhere the colored negative pieces inside the center of the frames, then trim any excess sticking out around the card panel's edges. Set aside.

Step 2: Ink-Blend and Layer the Floral Focal Points
Use the Lush Botanicals: African Daisy Die Set to cut the shapes four (4) times from white cardstock.
Using Parchment Pink Fresh Dye Ink and Coral Dusk Fresh Dye Ink, blend color onto the petals of each flower piece.
Blend a combination of Thistle Floret Fresh Dye Ink and Alpine Heather Fresh Dye Ink onto the centers of each flower die cut so the soft violet transitions smoothly to the base of the petals.
Use a combination of Wild Orchid Fresh Dye Ink and Bramble Berry Fresh Dye Ink to color the flower center die cuts.
Use the matching Lush Botanicals: African Daisy 3D Embossing Folder to add dimensional texture to each inked die-cut piece.
Assemble the flowers: Softly curl the petals upward for realism. Glue the second Piece 1 on a slight offset over the first. Next, adhere Piece 2 matching the key design (also slightly offset), and repeat with the remaining floral layers. Finish by adding the deep purple center pieces. Note: This will yield two (2) full, dimensional flowers.

Step 3: Final Assembly and Embellishments
Use the Festive Greenery Die Set to cut a few accent leaves from translucent vellum.
Using foam adhesive, adhere the vellum leaves at the top-left corner of the frame in the center of the panel. Then, use Instant Dimension Foam Tape to adhere the two layered florals atop the vellum leaves.
Stamp a sentiment from Regal Flourishes onto white cardstock using Shadow Fresh Dye Ink. Use the coordinating Regal Flourishes Block Die Set to cut out the sentiment, plus two (2) extra blank shapes. Stack them together with the stamped sentiment on top for extra die-cut thickness.
Use Foam Adhesive Strips to adhere your stacked sentiment to the bottom right of the florals, just below the frames.
Accent your design by scattering a few Coral Pearl Dots and Blush Pearl Dots around the card panel to complete the project!

I hope this project inspires you to look at everyday items in a whole new light and play along with us in the August 2026 Altenew Inspiration Challenge. I cannot wait to see what you create!
XO,
Nathalie
Play Along with Our Inspiration Challenge
Ready to share your own masterpiece? We love seeing how different artists interpret the same photo. To make sure your entry is eligible for our prizes, please follow these simple guidelines:
- Altenew products should be the focus, but other companies' products can be used.
- Make sure to use our challenge image above in your blog post.
- When uploading your project, make sure you link your entry post, not your entire blog.
- If you don't have a blog, feel free to upload your entries to the Crafter's Gallery and get the link to your photo.
- You may enter the challenge as many times as you wish!
- The challenge ends on August 31st, 2026, at 11:55 pm EST.
Inspiration Challenge Prizes
We love rewarding our community! After the challenge ends, FOUR WINNERS will be selected. Each will receive a $30 gift certificate to spend at www.altenewsnap.com. Winners will be announced on September 10th, 2026 on the Altenew Instagram account.

Feel free to use the badge above and let everyone know you are a participant in our Inspiration Challenge!
Join the Community and Share Your Art
Now it’s your turn!
Whether you’re inspired by a color palette, a shape, or a feeling, I can’t wait to see how you interpret this month’s challenge theme. Will your take be bold and graphic, or soft and true to life? Either way, be sure to link up your project and share your creative journey with us!
Click the blue button below to link your entry (or entries!). Good luck and happy crafting!